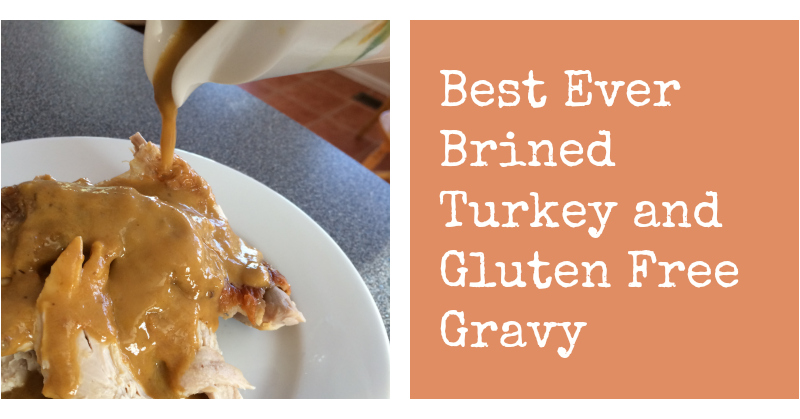
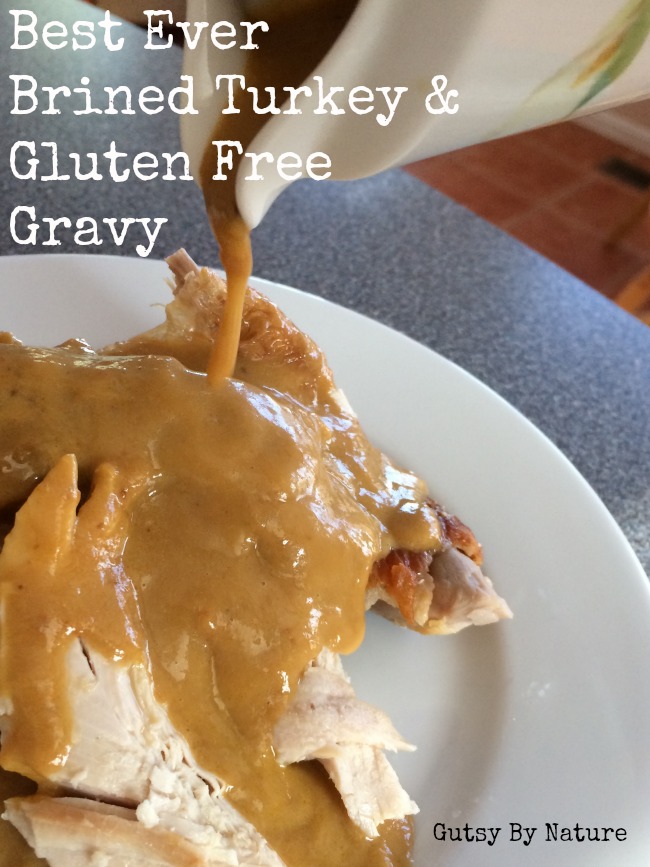
Two years ago I mastered gravy. I roasted, I simmered, I painstakingly created a roux. The end result was incredible. The perfect blend of saltiness and fat, thickened to a perfect texture. The star of the holiday table. So good, a few of my family members even licked their plates.
And then I went grain free when I began following first the Specific Carbohydrate Diet (SCD) and later the paleo autoimmune protocol (AIP) as a way to control Crohn’s disease and I thought my delicious gravy days were in the past. Early attempts at thickening broth with substitutes like arrowroot and tapioca were big disappointments. I was also less-than-impressed with the results of a recipe that called for simmering an onion in chicken broth and then pureeing it. So I had very low expectations of my gluten free Thanksgiving turkey, though I thought I might be able to create something that was at least reminiscent of a half way decent gravy.

To my great surprise and delight, the gravy I ended up with was better than half way decent… it was actually quite delicious!
Somebody might have even licked their plate. And by “somebody,” I just might mean me…
But I’m getting ahead of myself. The delicious gravy was born from drippings from a delicious turkey which began the night before with a soak in a simple brine, which I think was the key to the gravy.
The brining
This year we ordered a pastured turkey from a local farm and it ended up being bigger than I expected at 19 pounds, so I had to get creative with the brining vessel and the fact that it wouldn’t fit in our refrigerator. I used a styrofoam cooler like this one. I put the turkey inside a clean plastic trash bag inside the cooler, added the brine to the bag and tied it up, then placed another trash bag full of ice cubes on top of the turkey. I secured the lid and then left it in the coolest part of my house overnight. In the morning, the ice cubes were still mostly frozen, so I’m confident it stayed at a safe temperature.
My previous experiences with brining have been mixed – sometimes delicious, sometimes too salty, sometimes juicy, sometimes just water logged. So these directions are crucial. After about 8 hours in the brine, I removed the turkey and rinsed it thoroughly. Then I place the turkey on a wire rack over a cookie sheet and placed it in the refrigerator uncovered for about 6 hours, so that the extra water could drain and the skin get completely dry. I then took the turkey out of the refrigerator about 1 hour before roasting so it could come up to room temperature.
The gravy building blocks

The trinity of flavor (carrots, celery, and onion) are key here. I cut them into chunks, stuffed half inside the bird along with some herbs, garlic, and lemon, and scattered the rest in the bottom of the roasting pan with about a cup of water where they soaked up the turkey drippings and caramelized nicely while the turkey roasted. A v-shaped roasting rack and pan like this one works well for this.
The roasting
The challenge with a turkey is getting it fully cooked and with a beautiful brown skin but not letting the breast meat dry out. In previous years I’ve followed a technique that required you to start the turkey breast down and then turn it one wing up, then the other, and then finally breast side up. Since this turkey was so large, I didn’t want to do that much manhandling of it, so I compromised by starting the turkey breast down and then turning it up after 40 minutes in a hot oven.
After flipping the bird (ha-ha!) and basting it with some melted ghee, I turned the oven temperature way down, inserted my trusty thermometer into the thigh, shut the oven door, and ignored it for a few hours – until the temperature reached 170 degrees.
The gravy
The gravy was extraordinarily simple. With a slotted spoon, I removed the vegetables and set them aside. Then I used a fat separator like this one to isolate the tasty drippings from the fat. The fat I put into a jar and put in the refrigerator to be used in later cooking and the drippings I put into a blender along with the vegetables. A few pulses to puree them, then put the resulting gravy into a saucepan where it simmered on the stove while we carved the turkey and got the rest of the meal together. You could add salt and adjust seasonings to your taste, but I found that the drippings were perfectly salted from the brining and no additional salt was needed.
Notes on healing diets:
- Low-FODMAP: I’m sorry to say that this gravy is not low-FODMAP. However, many people who have issues with onions in their raw form do just fine with onions that are well cooked, which they definitely are in this recipe. Proceed with caution.
- Specific Carbohydrate Diet (SCD): This recipe is 100% SCD legal.
- Paleo Autoimmune Protocol (AIP): I use melted ghee and I think it is the tastiest option here. It is listed as stage 1 AIP reintroduction food in Sarah Ballantyne’s The Paleo Approach and many who don’t tolerate other dairy can still eat ghee. But if you are not able to use ghee, substitute coconut oil or some form of rendered animal fat like lard. I haven’t tried it, but I suspect that rendered duck fat would be divine!
Looking for more ideas for your holiday meals? Check out this ebook from the Bre’anna Emmitt, author of He Won’t Know It’s Paleo.
Paleo Turkey and Gravy Recipe
Print
Best Ever Brined Turkey and Gluten-Free Gravy
- Total Time: 18 hours 30 mins
- Yield: many
Description
This recipe and technique made the best turkey and gravy I have ever tasted… You will not miss the gluten at all.
Ingredients
- 1 1/2 cups kosher salt
- 2 gallons filtered water
- 1 turkey, preferably pasture raised
- 2 medium onions
- 4 stalks of celery
- 4 carrots
- 1 bunch of fresh sage
- 1 bunch of fresh rosemary
- 1 large lemon, cut in quarters
- 4 cloves of garlic, peeled
- 1 cup of water
- 1/4 cup of ghee or preferred solid fat (melted)
Instructions
- Dissolve the salt in the water in a large pot over low heat. Once salt is dissolved, place in refrigerator for at least two hours or until completely cold.
- Rinse turkey, removing neck and giblets and reserving for another use. Place turkey in a large vessel for brining, add liquid, and place in refrigerator (or keep cold with ice – see above) for 8 hours.
- Remove turkey from brine and rinse thoroughly. Pat dry with paper towels, place on wire rack over cookie sheet and put in refrigerator uncovered to dry for at least 6 hours.
- Remove turkey from refrigerator about 1 hour before roasting.
- Preheat oven to 450 degrees.
- Cut vegetables into large chunks. Scatter half of the vegetables in the roasting pan and add 1 cup water.
- Stuff cavity of turkey with remaining vegetables, herbs, lemon, and garlic.
- Truss with cooking twine and place turkey on roasting rack with the breast side down. Drizzle about half of the coconut oil (or ghee or butter) over the skin of the turkey.
- Place in oven and roast without opening the door for 40 minutes.
- Remove turkey from oven. Using wadded up paper towels, carefully rotate the turkey so that it is breast side up.
- Drizzle with remaining coconut oil (or ghee or butter) and return to oven for 20 minutes.
- Reduce oven temperature to 325 degrees. Use an instant read thermometer to monitor the temperature and remove from oven when turkey thigh has reached 170 degrees. For a 19 pound turkey, this stage took 90 minutes but oven temperatures and other conditions will cause this to vary.
- Set turkey aside to rest at room temperature for at least 30 minutes, while you make the gravy.
- Remove vegetables with a slotted spoon and set aside. Separate the fat from the drippings (some fat will remain and get incorporated into the drippings, but if you don’t remove at least some of the excess your gravy will be unpalatably greasy).
- Put vegetables and drippings into a blender (or use an immersion blender) and puree until smooth. Place gravy into a sauce pan and let simmer while you carve the turkey.
- Adjust seasonings if necessary and adjust thickness by adding more water or broth if necessary. Serve gravy piping hot.
- Prep Time: 16 hours
- Cook Time: 2 hours 30 mins
- Category: Main
- Cuisine: American
Please sign up for my weekly email newsletter to be the first to know about all my latest offerings and news!
This post featured on The Tasty Alternative and Paleo Grubs.
Shared on Allergy Free Wednesday.

34 replies on “Best Ever Brined Turkey and Gluten-Free Gravy”
[…] Best Ever Brined Turkey and Gluten-Free Gravy (courtesy of Gutsy By Nature) […]
[…] me, then I totally would. My husband likes the dark meat though, so we’re a whole turkey family. To Brine or Not to Brine??? – That is the question Paleo Herb Roasted Turkey Legs Perfect Smoked Turkey Apple Cider & […]
[…] Best Ever Brined Turkey & Gluten Free Gravy From Gutsy By Nature […]
Any suggestions on how to make this with a 9lb bone in turkey breast?
Do you happen to have a pressure cooker? If so, you could make this recipe: https://gutsybynature.com/2014/09/20/paleo-turkey-gluten-free-gravy-pressure-cooker/
I have an instant pot. That sounds delicious too. Thanks!
[…] Best Ever Brined Turkey and Gluten Free Gravy *sub lard or coconut oil for butter […]
[…] Best Ever Brined Turkey and Gluten Free Gravy (Gutsy by Nature) […]
[…] Best Ever Brined Turkey with Gravy by Gutsy by Nature […]
[…] Best Ever Brined Turkey with Gravy by Gutsy by Nature […]
[…] image via Gutsy By Nature […]
[…] Brined turkey and gluten free gravy […]
[…] Best Ever Brined Turkey and Gluten Free Gravy / gutsybynature.com… […]
[…] Best Ever Brined Turkey and Gluten-Free Gravy […]
[…] Best Ever Brined Turkey and Gluten-Free Gravy […]
[…] Best Ever Brined Turkey & Gluten Free Gravy Whole Roasted Chicken with Apples, Oranges and Fresh Thyme Roasted Apricot Chicken with Herbs De Provence The Viking’s Brined Turkey […]
[…] I hope these three case studies have helped you see how you can navigate some of the interpersonal, emotionally fraught elements of this beloved American holiday we call Thanksgiving (or any other holiday… I’m pretty sure these issues transcend national and cultural boundaries!). But, of course the logistics of what to eat and/or serve are also significant. Fortunately, the centerpiece of Thanksgiving, the turkey, is actually fairly easy to make in a way that will suit your dietary needs and make almost everyone else happy too. Here is my recipe for the “best-ever” brined turkey and gravy that is so good, you just … […]
While following your recipe, do you think I could substitute stuffing the vegetables in the turkey with traditional bread stuffing? I’m trying to accomodate my family who are all not on special diets.
Also what would be a quick way to separate the fat from drippings?
Thanks, Susie
Yes, you could make this with a traditional stuffing. Just make sure you use a thermometer to verify it has cooked to a safe temperature. And the best way to separate the fat from the other drippings is with a fat separator like this: https://amzn.to/2FiHJvE
i used this recipe tonight when making our turkey tonight. it turned out so well! it tastes AMAZING. thank you so much Regards Maria Williams
Hi! Great recipe, I’m looking forward to trying this for thanksgiving. How important is it for the turkey to dry in the fridge for 6 hours after brining? Does the patting dry not already do the trick? I’m a bit of a germaphobe and never has exposed raw meat sitting in my fridge like that. Thanks!!
I don’t think it is critical, but it does help you get a nice dark skin. FYI – Having it exposed won’t change whether or not germs grow on it… as long as it is kept completely cold, it will be the same whether you had it covered or not. The main reason we want to cover things in the refrigerator is to keep odors from one food seeping into another and making it taste weird, which really won’t be an issue with a turkey.
Thank you so much! I made this for thanksgiving and it turned out great. I didn’t end up leaving it to dry in the fridge (not enough time) and the skin was nevertheless nice and brown and crispy. Still enjoying the leftovers 🙂 thanks again for the recipe!
[…] Best Ever Brined Turkey & Gravy from Gutsy By Nature (use animal fat of choice instead of ghee) Butterflied Big Bird from Nom Nom Paleo (use duck fat option for AIP) Herb Gravy from Nom Nom Paleo (use pan drippings for AIP) Herb Roasted Turkey Legs from Paleo Cupboard (omit black pepper for AIP) Turkey with Apple Cider Gravy from A Clean Plate (use substitutions listed for AIP) Umami Gravy from Nom Nom Paleo (omit the tomato paste and black pepper; use AIP friendly fat) […]
[…] Get the recipe here. […]
[…] Best Ever Brined Turkey from Gutsy by Nature […]
[…] free range turkey from Polyface Farm (and this is how I’ll prepare it… though I’m also adding a gluten-free stuffing this […]
[…] El mejor pavo en salmuera y salsa sin gluten de Gutsy by Nature […]
[…] Best Ever Brined Turkey and Gluten-Free Gravy […]
[…] do not have a turkey recipe of my own, but my favorite AIP turkey recipe is THIS ONE from Gutsy by Nature. The brine gives it a fantastic […]
[…] my turkey for 24 hours in advance. It keeps the bird moist and flavorful. Use a brining bag and Gutsy by Nature’s Brining recipe. She also explains how to roast the turkey. This is a must […]
[…] Najlepszy indyk w solance i sos bezglutenowy przez Gutsy by Nature […]
Truly the best turkey recipe! I’ve used it numerous time and passed it on to friends and family, ones without food restrictions, and it’s now a staple for all of us!
Made this a few years now and have gotten rave reviews from it!! This year, I need to make it just for myself because I’m with family without restrictions who are making another turkey (butter and bread stuffing included). Can this recipe be used for a turkey crown instead? Are there any modifications you’d recommend?